Seiten

Sonntag, 3. Januar 2021

Erstellen eines startfähigen USB-Flashlaufwerks mit dem Dienstprogramm Diskpart


https://www.dell.com/support/kbdoc/de-ch/000136959/erstellen-eines-startf%C3%A4higen-usb-flashlaufwerks-mit-dem-dienstprogramm-diskpart


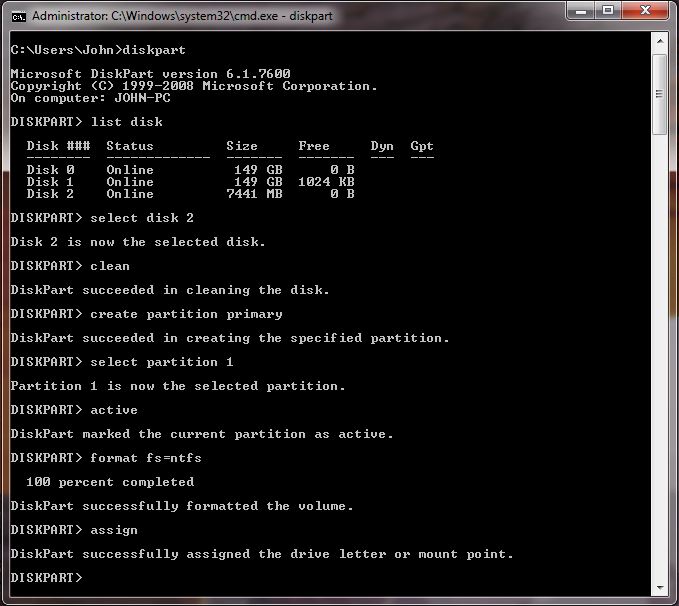
  1. DISKPART - Startet das Dienstprogramm.

  2. LIST DISK - Zeigt die Laufwerknummer Ihres USB-Flashlaufwerks an. Im Bild unten wird das USB-Flashlaufwerk als Laufwerk 2 angezeigt.
SLN153364_de__41368538222182.diskpart

  1. SELECT DISK X (Ersetzen Sie X mit Ihrer USB-Flashlaufwerknummer, in diesem Beispiel verwenden wir die 2)

  2. CLEAN - Löscht das Laufwerk

  3. CREATE PARTITION PRIMARY- Erstellt die Partition

  4. SELECT PARTITION 1- Wählt Partition 1 aus

  5. ACTIVE- Markiert die aktuelle Partition als aktiv

  6. FORMAT FS=NTFS QUICK - Formatiert die Partition

  7. ASSIGN- Weist einen Laufwerkbuchstaben zu.

  8. EXIT

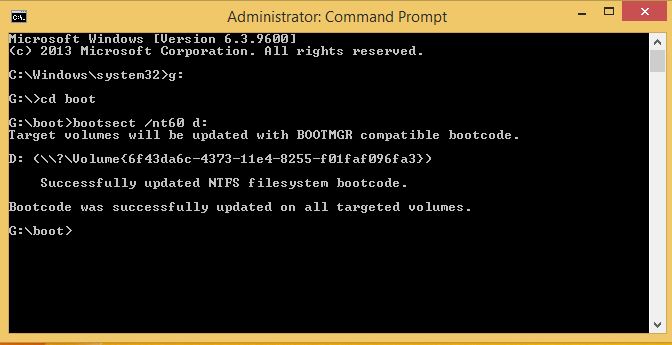
Legen Sie die Windows-DVD in das optische Laufwerk ein.
Geben Sie in der Eingabeaufforderung Folgendes ein:

g: enter> ("g" steht für Ihr DVD-Laufwerk)
cd boot enter> (Wechselt zum Startverzeichnis)
G:\boot bootsect /nt60 d: enter> ("d" steht für Ihr USB-Laufwerk)
SLN153364_de__5cmd_boot

Kopieren Sie alle Dateien von der Windows-CD mithilfe von xcopy auf das USB-Flashlaufwerk

cd\ enter>
G:\xcopy g:\*.* /s/h/f  f:\ enter>

Dadurch werden die Windows-Installationsdateien auf das USB-Flashlaufwerk kopiert, was kann einige Minuten dauern.

xcopy-Vorgänge sehen folgendermaßen aus:

/s - Kopiert Verzeichnisse und Unterverzeichnisse, außer leere.
/h - Kopiert verborgene und Systemdateien.
/f - Zeigt die kompletten Quell- und Zieldateinamen beim Kopiervorgang an.

Eine komplette Vorgangsliste wird angezeigt, indem Sie xcopy /? eingeben enter>


Sonntag, 25. Oktober 2020

blat mit stunnel

 ssl mit blat:


stunnel config.conf:

[bluewin-smtp]

client = yes

accept = 127.0.0.1:25

connect = smtpauths.bluewin.ch:465

verifyChain = yes

CAfile = ca-certs.pem

checkHost = smtpauths.bluewin.ch

OCSPaia = yes


Dienstag, 6. Oktober 2020

Send Mail mit Powershell


SendMail.ps1 File:

param ([string]$subject, [string]$Body, [string]$Attachments)

Send-MailMessage -To 'andi.lanz@gmail.com' -From 'sutter-admin@bluewin.ch' -Attachments $Attachments  -Subject $subject -Body $Body  -Credential(new-object PSCredential('mymail@bluewin.ch',(Convertto-SecureString 'mypassw' -AsPlaintext -Force))) -SmtpServer 'smtpauths.bluewin.ch' -UseSsl -Port 587


*.cmd file:


powershell -executionpolicy remotesigned -File "SendMail.ps1" -Subject "Subject" -Body "Bodytext" -Attachments "Attachment.txt"


Montag, 6. Mai 2019

Harddisk Test

winsat disk -ran -write -drive c

Mittwoch, 13. Februar 2019

Berechtigung ändern


find . perm 000 -exex chmod 400 {} \;

Mittwoch, 6. Februar 2019

shutdown remote

NET USE \\MyServer\IPC$ mypassword /USER:myuser

shutdown /r /t 3 /m \\ServerName

Dienstag, 2. Januar 2018

dcdiag /a /q


netdom query fsmo


Transfer the operations master roles

The operations master (also called flexible single master operations or FSMO) roles must be transferred from the Source Server to the Destination Server within 21 days of installing Windows Server Essentials on the Destination Server.
To transfer the operations master roles
  1. On the Destination Server, open a Command Prompt window as an administrator. See To open a Command Prompt window as an Administrator.
  2. At the command prompt, type NETDOM QUERY FSMO, and then press ENTER.
  3. At the command prompt, type ntdsutil, and then press ENTER.
  4. At the ntdsutil command prompt, enter the following commands:
    1. Type activate instance NTDS, and then press ENTER.
    2. Type roles, and then press ENTER.
    3. Type connections, and then press ENTER.
    4. Type connect to server <ServerName> (where <ServerName> is the name of the Destination Server), and then press ENTER.
    5. At the command prompt, type q, and then press ENTER.
      1. Type transfer PDC, press ENTER, and then click Yes in the Role Transfer Confirmation dialog box.
      2. Type transfer infrastructure master, press ENTER, and then click Yes in the Role Transfer Confirmation dialog box.
      3. Type transfer naming master, press ENTER, and then click Yes in the Role Transfer Confirmation dialog box.
      4. Type transfer RID master, press ENTER, and then click Yes in the Role Transfer Confirmation dialog box.
      5. Type transfer schema master, press ENTER, and then click Yes in the Role Transfer Confirmation dialog box.
    6. Type q, and then press ENTER until you return to the command prompt.

Sonntag, 3. September 2017

Serien Nummer auslesen

 wmic bios get serialnumber

Samstag, 20. Mai 2017

Shadow Copy mounten

To make a copy of the (C:) volume: (nur auf Server Betreibssystem möglich)
C:\> vssadmin create shadow /for=c:

To view copies of the (C:) volume:
C:\> vssadmin list shadows /for=c:

To mount a shadow copy as a browseable folder:
C:\>mklink /d <folder name> <shadow copy volume from list>
C:\>mklink /d C:\mycopy \\?\GLOBALROOT\Device\HarddiskVolumeShadowCopy6\

Achtung bei mklink ein \ anfügen

Sonntag, 19. Februar 2017

Shadow Speicher Freigeben

DISKSHADOW> delete shadows oldest d:

Samstag, 31. Dezember 2016

Windows 10 bootet sehr langsam

Disable Ultra Low Power State (UPLS) by doing the following.

(In the start menu, type regedit and hit enter. Confirm.)

1.) Disabling ULPS can be done by opening regedit and going to HKEY_LOCAL_MACHINE\SYSTEM\CurrentControlSet\Contro l\Class\{4d36e968-e325-11ce-bfc1-08002be10318}

2.) Change EnableUlps from 1 to 0 inside the 0000 and 0001 or 0003 keys.

3.) Restart your computer. Startup time will return to normal."

Mittwoch, 30. November 2016

Atmel averisp Programmer mit Arduino und Atmel-Studio nutzen

http://avrhelp.mcselec.com/index.html?libusb.htm

Wurde AtmelStudio nach Arduino installiert, funktioniert der Programmer nicht mehr in Arduino.

Mit Hilfe dieses Filters funktioniert er in AtmelStudio und Arduino.


Sonntag, 29. Mai 2016

Computer

"Hardware eventually fails.
Software eventually works"Michael Hartung

Montag, 25. April 2016

bootrec.exe

/fixmbr
/fixboot
/scannos
/rebuildbcd

Startprobleme, Multiboot


ev. vorher:

list disk zeigt die Festplatten an 
select disk x wählt die Festplatte x aus 
list part zeigt die Partitionen der Festplatte x an 
select part y wählt die Partition y aus 
detail part zeigt Infos zur Partition an; z.B. aktiv oder nicht, versteckt oder nicht 
active aktiviert die Partition als Bootpartition (dies dann wählen)

Samstag, 30. Januar 2016

sublime text 2 einrücken shortkey

{ "keys": ["ctrl+`"], "command": "indent" },
{ "keys": ["ctrl+;"], "command": "unindent" },

Samstag, 5. September 2015

arduino mit crumb128

zu make von ATmegaBOOT_168.c hinzufügen:

atmega128: TARGET = atmega128_slow
atmega128: MCU_TARGET = atmega128
atmega128: CFLAGS += '-DMAX_TIME_COUNT=F_CPU&gt;&gt;4' '-DNUM_LED_FLASHES=10' -DBAUD_RATE=57600
atmega128: AVR_FREQ = 14745600L
atmega128: LDSECTION  = --section-start=.text=0x1F000
atmega128: $(PROGRAM)_atmega128_slow.hex

zu board.txt hizufügen:

crumbuino128.name=Crumbuino-128 ATmega128

crumbuino128.upload.protocol=arduino
crumbuino128.upload.maximum_size=126976
# 14,7mhz
# crumbuino128.upload.speed=53084
crumbuino128.upload.speed=57600
crumbuino128.upload.tool=avrdude


# crumbuino128.upload.protocol=avr109
# crumbuino128.upload.maximum_size=126976
# crumbuino128.upload.speed=57600
# crumbuino128.upload.tool=avrdude

crumbuino128.bootloader.low_fuses=0xFF
crumbuino128.bootloader.tool=avrdude
crumbuino128.bootloader.high_fuses=0xDA
crumbuino128.bootloader.extended_fuses=0xFF
crumbuino128.bootloader.path=atmega
crumbuino128.bootloader.file=atmega/ATmegaBOOT_168_atmega128_slow.hex
crumbuino128.bootloader.unlock_bits=0x3F
crumbuino128.bootloader.lock_bits=0x0F

crumbuino128.build.mcu=atmega128
crumbuino128.build.f_cpu=14745600L
crumbuino128.build.core=crumb128
crumbuino128.build.variant=crumbuino128


zu programmer.txt hizufügen (mySmartUSB von MYAVR.com):

mySmartUSBan910.name=mySmartUSB_an910
mySmartUSBan910.protocol=avr910
mySmartUSBan910.communication=serial
mySmartUSBan910.program.protocol=avr910
mySmartUSBan910.program.speed=19200
mySmartUSBan910.program.tool=avrdude
mySmartUSBan910.program.extra_params=-P{serial.port} -b{program.speed} -F


in ATmegaBOOT_168.c auskommentieren:

#ifdef __AVR_ATmega128__
 /* no UART was selected, start application */
 if(!bootuart) {
        //a.l.
 //app_start();
       
 }

Sonntag, 14. Dezember 2014

Bare Metal Recovery eines HP Server auf vmware.

vmware findet das Abbild nicht auf der usb hd.

also Abbild auf hd des Hosts kopieren.

nach dem restore muss der regedit der Reparatur Option genutzt werden um folgendes zu ändern:

von:

http://terrytlslau.tls1.cc/2013/03/restore-windows-server-2008-r2-bare.html

13. Select "HKEY_LOCAL_MACHINE".
14. On the menu, click "File > Load Hive".
15. Navigate to "D:\Windows\System32\Config\SYSTEM".

19. Navigate to "HKEY_LOCAL_MACHINE\Recovery\ControlSet001\services\LSI_SAS".
20. Double-click "Start".
21. Change the "Value data" to "0".
 
 
If the above setting doesn't work, please change the following registry settings.

HKLM/System/CurrentControlSet/Services/<item below> and then the value of the "Start" parameter

Aliide = 3
Amdide =3
Atapi = 0
Cmdide = 3
iaStorV = 3
intelide = 0
msahci = 3
pciide = 3
viaide = 3


und in vmware:
 Make sure the .vmx file includes "scsi0.virtualDev = "lsisas1068"".


Donnerstag, 18. September 2014

Tabelle aus mysql

<?php
$host="127.0.0.1";
$port=3306;
$socket="";
$user="root";
$password="";
$dbname="dragrace";

$con = new mysqli($host, $user, $password, $dbname, $port, $socket)
 or die ('Could not connect to the database server' . mysqli_connect_error());

//a.l. : Probleme mit Dragrace Anmelungen Namen
$con->set_charset("utf8");
//$con->close();

    /*
    SELECT Resultate Tabelle mit Namen
    */
$query = "SELECT r.Start_Nr as 'Start-<br>Nummer',
                    r.id as ID,
                    u.`name` as Name,
                    u.angemeldet as Angemeldet
            FROM resultate r
            LEFT JOIN user u
            ON  u.start_nr=r.Start_Nr
            WHERE u.`angemeldet` > '2014-01-01 23:00:52.000000'
                    OR u.`angemeldet` is null
            ORDER BY r.start_nr, r.id";
$stmt = $con->prepare($query) or die ("error");
$stmt->execute();
$result = $stmt->get_result();
$field_info = $result->fetch_fields();
$stmt->close();
?>
<!doctype html>
<html>
<head>
 <meta charset="UTF-8">
 <title>Untitled Document</title>

</head>
<body>

<table border="1">

    <!--Spalten Titel-->
    <tr>
        <?php foreach ($field_info as $spalte){ ?>
            <td><?php echo $spalte->name ?></td>
        <?php } ?>
    </tr>

    <!--Daten Zeilen-->
    <?php while ($row = $result->fetch_row()){ ?>
        <tr>
            <!--Daten Spalten-->
            <?php foreach ($row as $val){ ?>
                <td><?php echo $val?></td>
            <?php } ?>
        </tr>
    <?php } ?>
</table>

</body>
</html>

Sonntag, 13. April 2014

REM RAID Status von ESXi-Host ermitteln:
REM c a.l. 2014


C:\Users\Administrator\Desktop\plink.exe 192.168.0.10 -l root -pw passwort -m "putty_comand.txt" | more > putty.txt


find  "State               :"  putty.txt > esxi_raid_state.txt


if [%1] == [send_state] goto :send_state

for /f "usebackq tokens=2 delims=:" %%a in (`find  "State               :"  putty.txt`) do if NOT " %%a" == "  Optimal" goto :send_error


goto :ende


:send_error
C:\Users\Administrator\Desktop\blat311\full\blat.exe putty.txt -to
al@alanz.ch -subject ESXi-Host-RAID-Error -q

:send_state
C:\Users\Administrator\Desktop\blat311\full\blat.exe esxi_raid_state.txt -to
al@alanz.ch -subject ESXi-Host-RAID-State -q


:ende
if [%2]==[nopause] exit

more esxi_raid_state.txt
pause
exit


putty_comand.txt:
cd /opt/lsi/MegaCLI
./MegaCli -AdpAllInfo aAll
./MegaCli -LDPDInfo -aAll


Umlaute in Batch Umleitung zu File Ausgabe richtig darstellen

CHCP 252


help for >for.txt


=
Führt einen Befehl für jede einzelne Datei für einen Satz von Dateien aus.
FOR %Variable IN (Satz) DO Befehl [Parameter]
  %Variable   Ein ersetzbarer Parameter bestehend aus einem einzelnen
              Buchstaben.
  (Satz)    ...........

Samstag, 12. April 2014

Raid Status von ESXi Host ermitteln:

plink.exe 192.168.0.10 -l root -pw xx -m c.txt | find "State               :"


Output:
State               : Optimal


c.txt:
cd /opt/lsi/MegaCLI
./MegaCli -AdpAllInfo aAll
./MegaCli -LDPDInfo -aAll

Freitag, 11. April 2014

MegaCli for LSI MegaRaid 9240-8i on ESXi 5.0

cd /opt/lsi/MegaCLI
./MegaCli -AdpAllInfo aAll
./MegaCli -LDPDInfo -aAll

Logging Plink output via batch

plink.exe 192.168.0.10 -l root -pw xx -m comand.txt > putty.log


comand.txt
cd /opt/lsi/MegaCLI
./MegaCli -AdpAllInfo aAll
./MegaCli -LDPDInfo -aAll


convert unix text to win text:
more putty.log > putty.txt

Samstag, 8. März 2014

Map Raw Disk VSpere / Status von RAID anzeigen

9TB local RAID5 Disk hinzufügen


mit putty ssh Verbindung zu Vsphere herstellen


ls -l /vmfs/devices/disks
ls -l /vmfs/volumes/
vmkfstools -z /vmfs/devices/disks/naa.6001ec90d854ba001aad69400d4ebb94  /vmfs/volumes/531a8c1a-00e1d2e6-ebaf-001ec9e59a22/Win7PRO_Eval/andi.vmdk


LSI Raid Controller Status Anzeigen
zip in datastore hochladen.
esxcli.exe -s 192.168.0.36 software vib install -d [datastore1]VMW-ESX-5.0.0-lsiprovider-500.04.V0.50-0006-offline_bundle-1487649.zip

Montag, 24. Februar 2014

Notice: (Revision) Installation of Microsoft Software Products Sold by HP (as OEM) on Virtual Machines Is Now Supported

For the VMware products listed above and future VMware versions, perform the following to enable the installation:

  1. Add the following line to the configuration file (.vmx) for each virtual machine:

    SMBIOS.reflectHost=TRUE

Samstag, 22. Februar 2014

bare metal recovery


  1. Recovery-Disk starten
  2. Computerreparaturoptionen, dann Eingabeaufforderung wählen
  3. diskpart starten, list disk ausführen, die Zielplatte identifizieren
  4. select disk
  5. und - jetzt kommt's - clean ausführen - und Stunden und Tage der Suche sparen :-)
  6. dann exit und die Systemabbild-Wiederherstellung laufen lassen
Hintergrund ist, dass das clean auch eine vermeintlich leere Platte wieder in einen uninitialisierten Zustand mit leerem MBR zurücksetzt. Genau das scheint das Wiederherstellungs-Tool manchmal zu benötigen, warum auch immer.

Donnerstag, 20. Februar 2014

VirtualBox

About VirtualBox

VirtualBox is a general-purpose full virtualizer for x86 hardware, targeted at server, desktop and embedded use.
For a thorough introduction to virtualization and VirtualBox, please refer to the online version of the VirtualBox User Manual's first chapter.

Donnerstag, 13. Februar 2014

Lizenzserver nicht gefunden

Terminal Server 2012 – Lizenzserver nicht gefunden

Wenn der Remote Desktop Lizensierungsserver nicht akzeptiert wird:
Auf dem TS gpedit.msc
Computerkonfiguration -> Administrative Vorlagen -> Windows-Komponenten -> Remotedesktopdienste -> Remotedesktopsitzungs-Host -> Lizenzierung
Angegebene Remotdesktop Lizenzserver verwenden: SERVERNAME
Remotedesktop-Lizenzierungsmodus festlegen: Benutzer oder Gerät

Montag, 10. Februar 2014

Dual Boot eines Klons auf einer VHD

Tools:
Citrix Xenconvert :   Installiertes Windows in eine VHD umwandeln


Advanced Tokens Manager:    Aktivierung kopieren


HKEY_LOCAL_MACHINE\SYSTEM\MountedDevices:  alle Laufwerknamen-Einträge in Klone-Registry vor dem booten des Klons löschen.

Donnerstag, 9. Januar 2014

Montag, 11. November 2013

HP Server Festplatten Status Prüfen

@echo off
REM Den Status der Festplatten prüfen c A.Lanz
REM **********************************
set log= "C:\Dokumente und Einstellungen\Administrator\Desktop\e200 Raid Status.txt"
C:\Programme\Compaq\Hpacucli\Bin\hpacucli.exe ctrl slot=4 logicaldrive all show status > %log%
C:\Programme\Compaq\Hpacucli\Bin\hpacucli.exe ctrl slot=4 physicaldrive all show status >> %log%

REM Wenn im logfile bei jeder Zeile hinten nicht ": OK" steht, dann eine E-Mail schicken.
for /f "usebackq tokens=2 delims=)" %%a in (`find  "):"  %log%`) do if NOT "%%a" == ": OK" goto :send

if [%1]==[send] goto :send
goto:eof

:send
blat.exe %log% -to al@alanz.ch -subject SvenServer-RAID-Status -q
goto:eof


REM ==========================================================
rem so sieht das logfile etwa aus:

   logicaldrive 1 (298.0 GB, RAID 5): OK
   physicaldrive 2I:0:5 (port 2I:box 0:bay 5, 160 GB): OK
   physicaldrive 2I:0:6 (port 2I:box 0:bay 6, 160 GB): OK
   physicaldrive 2I:0:7 (port 2I:box 0:bay 7, 160 GB): OK

Freitag, 8. November 2013

UAC

So aktivieren bzw. deaktivieren Sie die Benutzerkontensteuerung

  1. Öffnen Sie die Einstellungen zur Benutzerkontensteuerung, indem Sie zunächst auf die Schaltfläche StartSchaltfläche "Start" und anschließend auf Systemsteuerung klicken. Geben Sie im Suchfeld den Text UAC ein, und klicken Sie anschließend auf Einstellungen der Benutzerkontensteuerung ändern.